Physical Address
304 North Cardinal St.
Dorchester Center, MA 02124
Physical Address
304 North Cardinal St.
Dorchester Center, MA 02124
Every year, I plan to book a photographer in advance to capture printable holiday shots that I’ll send to my loved ones. But between busy schedules, high fees and life in general, I always end up doing it myself. I’ve gotten surprisingly good at taking almost professional shots with just mine iPhone, Apple watchAnd a tripod. Here’s how.
Portrait mode is what creates the blurred background effect in the shot, and it’s the camera mode I turn to when taking photos of vacations, people, and pets. This is what professional photographers call the “bokeh” effect, which adds contrast between the background and the foreground, making your subject stand out. Simply swipe to the Portrait option at the bottom of the camera screen, tap on the subject, wait for the focus and caption box to turn yellow, then take the shot.
Although the iPhone uses software to mimic this effect, rather than adjusting the aperture and focus of the lens like Traditional DSLR — The result is still impressive and may not be noticeable to most people. The edges of the subject may appear sharper, and accidental fringes or stray hairs may become inadvertently blurred. But they get close to the real thing, and are a great option for portraits if you’re aiming for a professional look without the hassle of a DSLR.
The other advantage of using Portrait mode in your shots is that you can adjust the lighting, focus, and blur intensity even after you take the photo. To edit, tap the slider icon in the lower-right side of your photo and tap and Icon at bottom left. You can now click anywhere on the shot to change focus.
When you take photos in portrait mode, additional editing features are available to help you improve your shot.
To adjust the lighting on the subject, click the hexagon at the top left and then use the slider option at the bottom of the shot to preview each lighting option and adjust the intensity of the effect. You can also click the letter F in the upper left over the image to reduce or intensify the blur.
The biggest downside to using portrait mode is that it requires your subjects to remain relatively still to lock in focus. And if you’ve ever worked with pets or young children, you know this is no easy feat. When I have curvy subjects or a large group shot, I usually switch to Live Photo. You’ll find this option in the upper-right corner of the default photo mode on your iPhone (it’s a wavy icon with concentric circles). Just tap the ripple icon until you see the word “Live” appear on the screen.
Live Photo automatically takes about 1.5 seconds of footage before and after you press the shutter button, giving you a short three-second clip for each shot. In your camera roll, the photo will appear as a regular photo, but if you long press on it, you’ll see it come to life.
If the highlighted frame isn’t perfect — for example, someone blinked, or your child’s face is sunken in the snow — you can go back (or forward) in time to select a better frame. To do this, tap the edit icon in the bottom right corner, then select “Live” in the bottom left. Scroll through the shots and choose “Create Main Photo” when you find a more attractive shot.
Keep in mind that the keyframe has a higher resolution than the rest of the clip, so if you select a different frame, you may notice a slight drop in quality. However, it’s a small trade-off to turn an unusable snapshot into something worthwhile.
Whether you’re using Portrait mode or Live Photo, good lighting can make or break your shot. I’ve always known that sunrise and sunset are the best times to take photos because they provide the most flattering light, with the least harsh shadows. But it wasn’t until a few years ago when this self-proclaimed iPhone photographer realized she wasn’t using the gold watch to its full potential.
Typically, placing your subject in front of a bright light source like a setting sun is not ideal. It’s great if you’re trying to be mysterious and artistic, but it’s not the best way to let grandma rejoice at the adorable faces of her dear grandchildren. Hence, I place my target directly facing the setting sun, even if it means being momentarily blinded. Sometimes I would remove it, but other times the lighting was too harsh and highlighted all the imperfections.
Now, if there is no cloud cover, I break my rule of thumb and do the exact opposite by placing my target in front of the sun. iPhone cameras have advanced to the point where they can compensate for a bright background and keep the subject well lit as well. Backlighting creates an almost halo effect around the subject, softening facial features and giving the entire shot a more seductive and exotic look.
Phone cameras have gotten better at adapting to sunlight in recent years, and are more forgiving than they were in the past.
If you don’t need to be in the shot, you can stop reading this section now. But if you want to join the action, you’ll definitely need a tripod and a timer. You can get creative and use a few hair ties and a fence post (I did this in a pinch), or you can invest $20 in a proper tripod and save yourself the headache.
Related to: Best iPhone Camera Tripods & Accessories
Once you’ve set up your tripod, place everyone but yourself in the frame and lock focus by holding down your subject until the focus box turns yellow and “AE/AF Lock” appears on the screen. Next, tap the arrow at the top center of the screen, just below the selfie camera (or to the left of center if you’re holding your phone in landscape mode). This will reveal some icons on the other side of the screen.
Scroll left (or down, depending on the direction of the shot) until you find the timer icon. Click on it. Now find out how fast you can run, and set a deadline. Press the shutter and get into position. The flash on the camera will act as a countdown. If you’re in the default photo mode, your phone will take a selection of 10 photos to choose from. Portrait mode is less forgiving; You only get one shot to get it right, so you may have to run back and forth from the tripod to your group until you’re out of breath or get the shot right.
If you’re open to changing phone models, you may not need a tripod at all. “Add me” feature on the Pixel 9 It uses augmented reality and artificial intelligence to stitch images together, meaning you can take separate photos and later combine them into one group shot.
If you’re not in the mood to sweat, consider using a remote shutter. Most tripods come with one, but it’s difficult to pair—and I’ve yet to meet a remote that I haven’t lost. Maybe you are more responsible than me, but my way of hacking is to use Apple watch instead of.
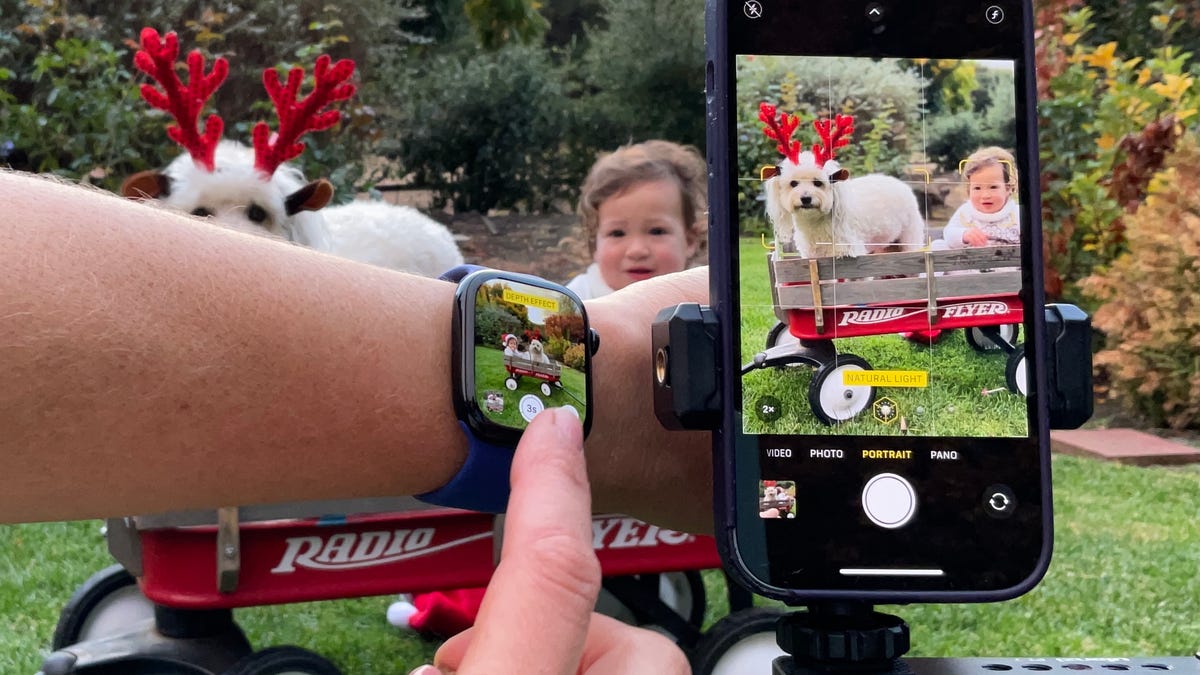
Set up your shot, walk slowly to join the rest of your group to take the photo, and open the Camera app remotely on your Apple Watch. The app mirrors exactly what’s on your iPhone screen, so you can check your wrist to see if you’ve entered the frame. You can also adjust focus directly from your wrist. Once you press the capture button, it defaults to a three-second timer, giving you enough time to lower your wrist and get into the pose.
Use your Apple Watch screen to make sure you’re in the shot. Your watch can also act as a remote control for the shutter button.
If I haven’t stressed this enough, photographing young children and pets is a thing in itself and requires superhuman patience. They rarely cooperate unless you’re armed with props and bribes, and even then, they may burst into tears (or wail) at any moment.
The best prop is one you can have, such as a stroller or seat, but this may not be enough to keep them from wandering off. Get children’s attention by giving them a specific task, such as blowing a kiss on camera or hugging a sibling. And if all else fails, keep a stash of your pet’s favorite treats or treats in your pocket. M&Ms work great as bribes for kids because they are discreet and can be consumed discreetly between shots.
Most importantly, be prepared to roll with the punches. Even if you follow every tip, there is always a wild card; Unpredictable weather, wine stains, or family drama can easily derail the perfect shot. When that happens, you can either master Photoshop (don’t worry, I’ll cover that in a future tutorial) or embrace the chaos and let the moment live, imperfectly, in your holiday card.
